
MASTER BATH
Day 1


We're remodeling the house in stages. It's the only way to live here while remodeling and it also puts the amount of work into bite sized chunks.
Phase 1 of the Master Bath is simple. The walls have terrible patchwork (same as the rest of the house) except in this room, someone also did a terrible job of adding an orange peel type knockdown texture.


The first step is to skim coat the entire bathroom, making the walls smooth. Phase 1 will also consist of:
- new paint
- all new light fixtures
- new electric switches and outlets
- new medicine cabinet
- new decor and mirror
- broken grout removal and replacement
- shower floor glazing
Phase 2 will come at a later date and will consist of:
- all new fixtures on the sink, shower and tub
- Shower walls replaced with frameless glass.
- possible new shower tile floor
-possible wainscoting ceiling


You can see the before wall above and the after wall below. I'm slowly making my way around the whole room and it should be finished in the next couple days.

As I'm skim coating, I also need to move some electrical. For some unknown reason The sconces that go on either side of the soon to be mirror are not centered on the space. You can see in the pic below that the left electrical box is about 2 inches from the wall. It needs to be about 3 inches to the right. This will center both lights to the space and the light won't be pushed up against the corner (Which is how it was). I'm thinking, because the stud is there, they just attached the receptacle to the stud and said, "Good enough."
I will cut a hole in the drywall and remove the receptacle. Then I'll use some scrap lumber by attaching it to the stud. Then I'll attach the receptacle to the lumber in order to move it a few inches to the right. Then I'll have to patch everything.
It's a lot of work to move a light 3 inches, but I want everything to be symmetrical.

I taped off the center of the space, and you can see from the photo above that the receptacle on the left about 2-3 inches too far to the left. You can see in the pic below how close it is to the wall. Aesthetically, a sconce that close to the wall would drive me nuts, so the extra work of moving it over is a must. These pics also show how much previous damage has been done to the walls.

Step 1 was to cut out the drywall to where I want the box to go.

Then I attached some scrap lumber to the stud and the reattached the box to that lumber - moving the box over the 2 inches needed

Finally, I added a patch and applied mud and sanded it smooth

PAINT - WALLS

BENJAMIN MOORE
Juniper - Regal Matte Finish
A rich, deep green that takes its name from the aromatic juniper berry, this color works beautifully with off-white and neutral tones.
After all of the walls were skimmed and sanded smooth, it was time to paint. We chose this beautiful color called Juniper from Benjamin Moore. With so much white in this bathroom we wanted the walls to really pop and this color certainly does that.

We chose their Matte Finish. It's basically a Flat finish, but allows wiping and cleaning which is a must in a bathroom. It looks like velvet and we can't wait to see the room finished.
LIGHTING
We spent a long time looking for the perfect lighting. We wanted something that fit into the Art Deco style, but are modern enough to look like the 21st century. The sconces we chose were 2 of these beautiful powder coated black and raw solid brass torches with white glass shades and an over medicine cabinet sconce with clear glass shades.


TILE
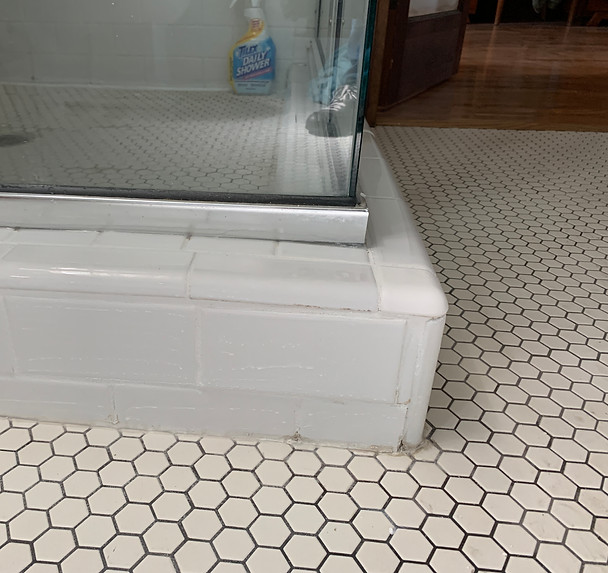
While we wait for the mirror to be delivered, I decided to clean up the tile. The grout around the shower doors and the bathtub fixtures is so stained and cracked that the only solution is to remove all of the grout and redo it. You can see in the pic below what I mean.


I got a grout removal bit for my Dremel Multi-tool and plunged it into the grout. It blasted the old ground out pretty easily. You can see in the pic below, enough of the grout has been removed for the new grout application.

Because I'm not doing a ton of grout work, I bough Bright White premixed grout in a quart tub from the hardware store. Applied it according to the directions and it actually matched the previous grout perfectly. You can see the tile after the new grout in the pic below. After this sets, I'll use a cleaner to remove the grout residue and that should be it. There are a few other spots in the bathroom that need re-grouting, so now I'll make my way around the room fixing what needs it.
This is really just a quick cleanup fix. Eventually we want to put frameless glass doors on the shower, so I'm not going to worry about the different heights of the tile. I will have to retile all of this down the road when the shower door framework is removed. For now the dirty, gross brown grout has been taken care of.
You can also see the floor in the shower needs some work and I will be applying a 2 part black glaze to the shower floor in the future.
I changed out the particle board medicine cabinet with more of a modern sleek look. I had to raise the sconce about a foot from the previous location. The old sconce was butted up right against the top of the cabinet and so more space needed to be given between them.

We pulled out the recessed light over the bathtub. We wanted something a little more grand than the canned light that was there. We bought this beautiful glass chandelier and a canned lighting conversion kit.
We're just waiting on the mirror that goes in-between the 2 sconces, adding some decor and changing out the chrome fixtures to black.


After we repiped the entire house, we added new hardware to the sink, bathtub and shower. A few of the subway tiles have been cracked in the process, but these will be fixed in the coming days.
We picked matte black fixtures that went with our new lights. We also chose low profile and a more modern look to balance the deco lights and mirror.
